Tuesday, 12 June 2012

Crispy Pata and Chicharrón (Easy version)

Teh:

Crispy Pata and Chicharrón 

Through sheer luck and by the hands of fate, i decided to attempt a Chicharrón (deep fried pork belly fried in it's own fats!) recipe i stumbled upon the internet. By right, the you are supposed to boil/simmer the pork belly with some water for a few hours and let the fats seep out before turning up the fire to fry it. But half way through cooking, I was advised by my filipino friend that the pork sold in Singapore is unlike those in the Philippines! Apparently the pork sold in Singapore is thin and qualifies to be a spokesperson for pig slimming pills (if there were ever such a thing). Hence, it is almost impossible to get enough lard from the cooked pork belly for its own deep frying. At this point in time, images of pork fat cubes sold at Sheng Siong flashed across my mind. I could stir fry the fats until i get enough oil to fry the pork belly! Yes it's cheating but it's also a viable method. Unfortunately, there was no extra fats at hand. So i did the next best thing, throw the cooked pork belly into the deep fryer (yes with normal vegetable oil). I ended up with pork belly that was crispy on the outside and tender on the inside! I can only imagine how much more fragrant it will be if its fried in lard.
Close up Crispy Pata and Chicharron 

On the day of my experiment, I bought pork front knuckles as well. The idea was to boil them till tender and deep fry it to obtain a crispy skin. In my head, i figured that's how pork knuckles are done. That same filipino friend said its a popular dish they have in the Philippines - Crispy Pata! Boiling the knuckles made them tender. Deep frying them made the skin crispy. Not quite like the pork knuckles sold outside but a yummy snack nevertheless. Check out the simple and straight forward recipe below for a 2 in 1 treat!


Ingredients:
Pork knuckles/leg/front or hind hock (Sold in Sheng Siong). Pick the ones with meat and skin!
Pork Belly (as much as you like)
Water
All Purpose Seasoning (You can pick you own desired seasoning. To be sprinkled on the pork at the end of the frying)

Method:
1. Cut the knuckles and pork belly into small pieces. Note that the pork will shrink when cooking. If you don't want to end up with mini pieces, don't cut too small.
2. Put all the pork into a pot of water to boil and simmer. It's a bit tricky to tell you how long they should cook because it depends on how much pork you are using. Pork knuckles will take a longer time to cook and be tender compared to pork belly. I recommend 1.5 hours to 2 hours ought to be enough.
3. Drain the pork.
4. Deep fry in oil till crispy. It takes less than 5 minutes. Do not walk away! Watch the pork!
5. Sprinkle desired seasoning on the fried pork. Serve immediately.

Monday, 4 June 2012

Excursion to Batam (Day Trip)

Teh:

I want to blog about my experience to Batam since while i was goggling the map for more information, there was very little i could find from local bloggers.

I went to Batam on a Saturday. Prior to that, i first had to decide which ferry terminal i wanted to alight at. Based on pure speculation, we picked Batam Centre to stop. We took Batam Fast's ferry. I called (tel: 6270 2228) their Harbourfront office on Friday to book the tickets. You have to get ready names, passport nos, dates of expiry and dates of birthday for reservation. Please check Batam Fast's website for the ferry schedule. The whole journey from departure to stepping foot in Batam took about 1hour and 15 mins.

On departure day, you are supposed to pick up the tickets at the counter 1 hour before the ferry departs. Being the kiasu Singaporean i am, i went earlier. We were supposed to catch the 10.50am ferry. I was at Habourfront to collect the tickets at 9.30am while imagining there was going to be a long queue of people. But i was wrong. There were only 2 people in the queue. I was given the tickets (aka boarding pass) and the arrival and departure forms all filled up! Very impressive! The total cost per pax for both ways including both terminal fees is S$47. You can pay by cash, nets or credit card. You will be given the boarding pass and an open ticket for the ride back. You have to book your ferry timing at the Batam ferry terminal with your open ticket. I suggest you book the timing upon arrival so as to guarantee a seat back at the time you want. Departure gate closes 15 minutes before departure time. Go earlier to avoid any unexpected delays from the crowd.

As my dad rightly pointed out, the exchange rate is slightly better in Batam. Upon arrival at the Batam Centre Ferry Terminal and exiting the customs area, turn right and there are 2 money exchange counters. The counter staffs practically waved at us in hope that we would go to their counters. Quite an amusing sight. Initially they quoted me 720,000 rupiah for S$100 which was the same as when i asked in Singapore. In the end i asked for more after telling her we were changing S$200. She gave us 730,000 rupiah for S$100.

Since we were going Isabella (based on Lady Iron Chef's review) for massage, there was free transport provided to and from the massage place. The driver was already waiting for us with a paper stating my name. He spoke almost no English at all. But it was ok. Pointing helps! Please email Isabella @ info@isabellamassagehouse.com for their massage price list. Their response is quite fast. I picked the foot, hand and shoulder reflexology package while my friend picked the Aroma Therapy massage. It was 2 hours each and cost 200k rupiah. About S$30. The ride to Isabella is 15-20 minutes. The length of the journey is not long but the vehicle was travelling rather slowly. Safety first i guess. Isabella is right behind Nagoya Hill Shopping Centre. When we arrived at the centre, we told them we wanted to have lunch first and delayed our appointment time by 30 minutes. The staff were friendly and eager to serve. They gave us welcome drinks.


Lunch was A&W at Nagoya Hill Shopping Centre. After hearing my friends rave about A&W, i wanted to eat it too. But i was sorely disappointed by the poor quality of the food served. Do not think the chicken is big and juicy just like they were in Singapore. No! The chicken was small and dry. The curly fries was of a very small serving. And rootbeer float, is unfortunately about the same everywhere. There was not much shopping to be done at Nagoya unless you want to buy fake branded bags. There were tons. There was a hypermart at the basement. There was also a stretch of food stalls in the mall. A Ba Kut Teh shop caught our eyes but were were too full from the unsatisfying A&W. Maybe next time.


The massage experience was so-so only. Then again, massage is matter of preference. After our massage, there were a lot of people coming in but were disappointed as the place was fully booked. So its best to book before hand to avoid disappointment. We left for Batam Centre shortly after drinking free ginger tea at Isabella. I heard they are able to send you anywhere in the town area for free. Maybe next time we will ask them to send us to a seafood place.


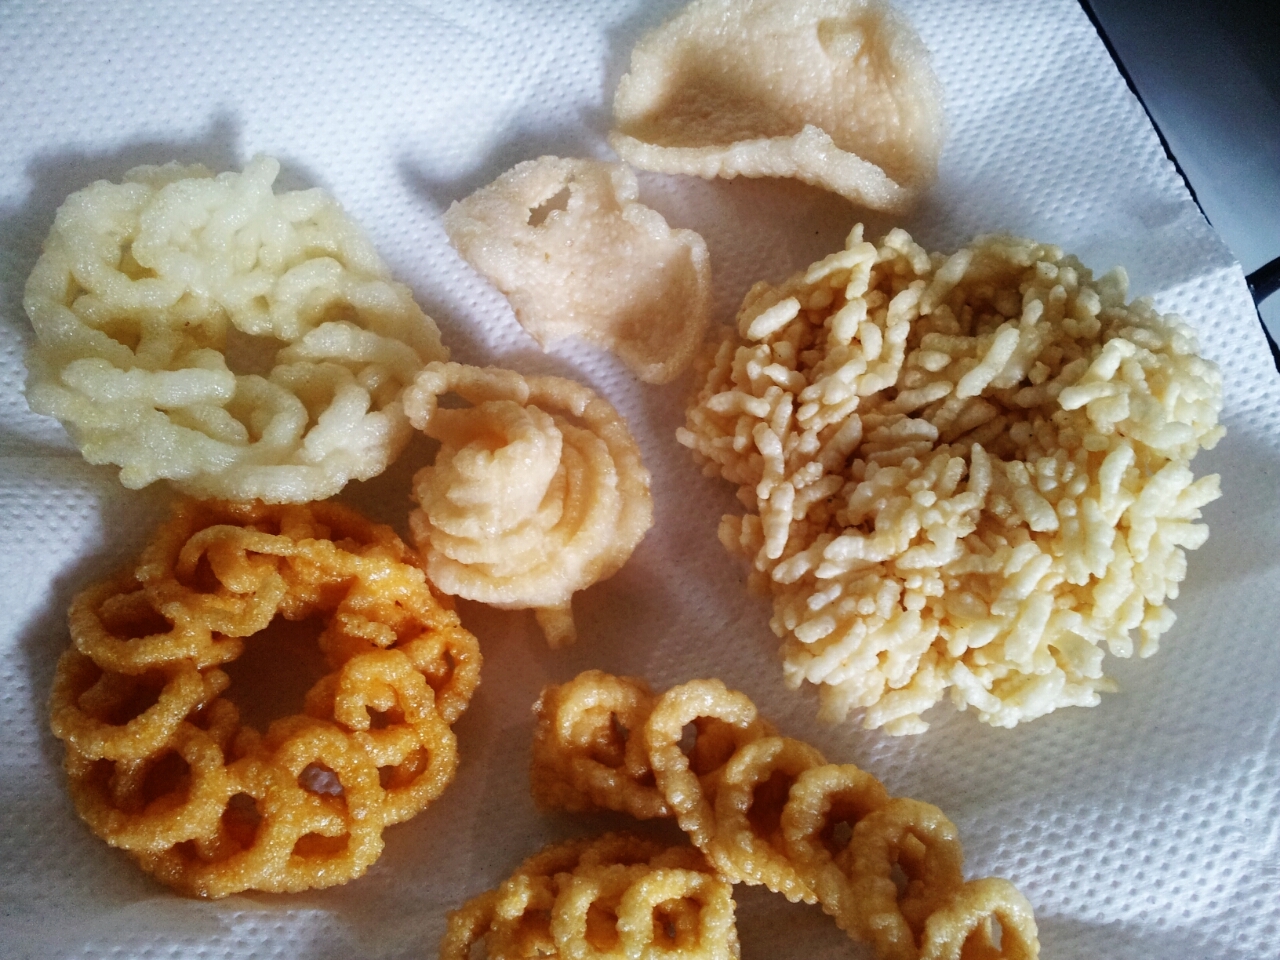
Batam Centre is connected to Mega Mall (i think) via a overhead bridge. Mega Mall looks bigger and newer than Nagoya Hill Shopping Centre. We zoomed to the hypermart after restraining ourselves for the whole day. My friend bought a whole range of indo mee. Apparently their instant noodles are of superb quality. I bought 6 different types. Maybe i will blog about it when i've tried them. My unexpected gain from the hypermart was the 6 varieties of keropoks! I went crazy. I have never seen such keropoks before! I bought a bit of each and went home to fry. Check out the picture. I think the pinkish normal looking keropok (at the top right corner) tasted the best. Its supposed to be fish flavour. The rest tasted similiar, with exception of the rice one. 
Keropoks
I bought a pack of chicken marinate (ayam goreng) in hopes of making ayam penyet. I also bought a pack of mix for goreng pisang. I bought a pack of frozen puff pastry sheets, 750g for S$3. Yes i'm mad. I'll tell you if they are any good when i've tried them.


I conclude, massages and things at the hypermart are cheaper than Singapore's. But whether is it worth spending $47 just for an average massage and to get to a cheap supermarket, maybe not. I think i'll rather go Johor Bahru. Nevertheless, it was good to do something different for a change. The trip was rather relaxing after all the anxiety of planning for it.

For those who want to stay overnight, we spotted Harris Hotel (new and upgraded) right next to the Batam Centre Ferry Terminal. My friend says next time we go Batam, we'll go have Ba Kut Teh, go massage, check in at the hotel, buy loads of beer at the hypermarket, buy dinner and go back to the hotel for a pig out session. The next morning we can tan at the pool until check out, followed by seafood dinner before heading back to Singapore. Sounds like a good plan.

Monday, 28 May 2012

Egg Benedict

Teh:

I remember when i was learning driving and had to tackle a particularly difficult turn, i said to my teacher "so difficult!". My teacher replied "It's only difficult because you haven't learned how to do it.". His words always come back to me whenever i encounter difficulties in learning new things. After i've learned how to do them, they were a piece of cake.

Learning how to do poached eggs was a daunting task. I had a few failed attempts and wondered why. As i only learned what i see and read from the internet, it took a few trial and errors to finally get it right, and beautiful! Without further ado, let's get to it! It's a step by step post, and probably the longest yet.

Poached Egg

I learned a neat trick to get rid of the floating messy white bits that swim around in the water while you wait with bated breath for the poached egg to form - use a slotted spoon. As you can see i cracked the egg onto a ladle with holes to "drain" away the liquid-y egg white, while leaving the "solid" whites intact with the yolk. We have all read that only the freshest egg can make a beautiful poached egg. But how do we know which is the freshest? What i did was check the expiry dates on the packaging and picked the one that was going to expire the latest.

Next, boil a pot of with enough water so that you will be able to submerge the whole egg. When the water is boiled, turn the heat down to the lowest so that the water is simmering. This step is crucial! A pot full of boiling water (aka big bubbles) will definitely ruin the poached egg. There is no need for swirling the water nor putting vinegar in this recipe. Just plain water.

When the water is simmering, gently slide the egg into the pot and remove the slotted spoon. The egg will sink to the bottom of the pot. Don't worry. It shouldn't stick. It takes around 2 to 3 minutes to cook, depending how runny/firm you like the yolk to be. You can scoop the egg out with the slotted spoon to test it's firmness. When it is done, submerge the egg into a bowl of water (tap water will do!) to stop the cooking process.
After egg slide into the pot
After cooking for 2-3 minutes


Hollandaise Sauce

Hollandaise sauce
Ingredients:
2 egg yolks
1 tsp mustard
1 tbsp lemon juice
a pinch of cayenne (optional)
110g of butter

Method:
1. Combine egg yolk, mustard. lemon juice and cayenne into a blender. Blend for 30 sec to 1 minute until its well mixed.
2. Melt butter in a pan.
3. Pour the melted butter immediately but slowly into the blender to mix with rest of the ingredients while it is on high. As soon as you finish pouring the butter into the blender, it should take only 10 to 15 seconds for it to come together to form a thick rich sauce that is bright yellow in colour.

Egg Benedict

Take a muffin, cut it into 2. Toast and use only 1 half of it. Put a piece of cooked bacon on the muffin. Put the egg and topped it off with the hollandaise sauce. Viola! Of course you can substitute the bacon with smoked salmon or spinach to make Egg Royal or Egg Florentine. It's entirely up to you. Enjoy!
Egg Benedict

Friday, 25 May 2012

Egg Benedict (Coming soon!)

I finally got it right! Recipe coming soon next week!


Egg Benedict

Tuesday, 22 May 2012

Poll 2 - Which do you prefer? We really want to know!

Monday, 7 May 2012

Chilli Chicken Pesto @ Flying Hog Cafe & Bar

Teh:

Chilli Chicken Pesto - A pasta with chilli padi for the extra oomph! Must try for pesto sauce lovers @ Flying Hog Cafe & Bar (www.flyinghog.com.sg).


Chilli Chicken Pesto

Friday, 4 May 2012

Aglio Olio Al Funghi @ Flying Hog Cafe & Bar

Teh:

I made this at the cafe yesterday. The garlic was brown and crispy. Absolutely fragrant! Try this at Flying Hog Cafe and Bar! (www.flyinghog.com.sg)

Aglio Olio Al Funghi